AUTO CREATING A PO FROM PURCHASE REQUISITION
Purchasing gives you the ability to create papers/documents automatically. From any accessible purchase requisition lines, buyers can rapidly construct conventional purchase orders, planned purchase orders, and RFQs.
Picking requisition lines and adding a supplier—and then letting Purchasing handle the rest—can be as simple as selecting requisition lines and adding a supplier—and letting Purchasing handle the rest.
Collect all requisition lines that fulfill a predetermined set of criteria.
• Break up a single procurement line into multiple requisition lines.
• Combine multiple requisition lines that are similar into a single purchase order line.
• Immediately after creation, review or edit your purchase orders, quotations, or RFQs.
Auto Creating Requisition to PO
Navigation
India Local Purchasing —-> Auto Create
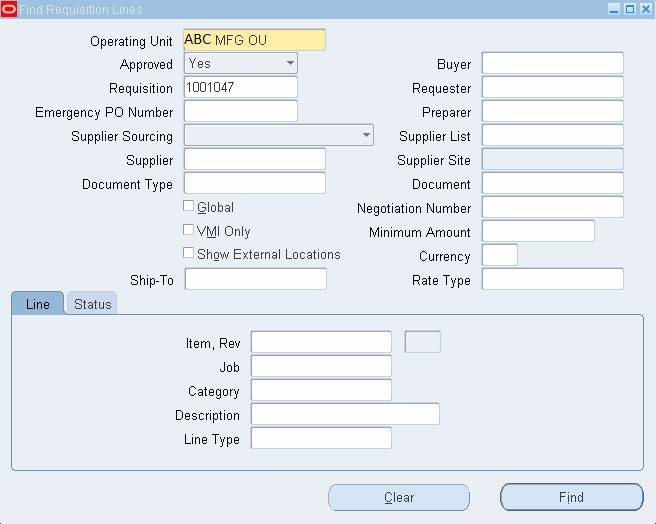
- Go to the window navigate to “Find Requisitions.” Enter the Approved Purchase Requisition No, which must be created automatically. Make sure the Buyer Name field is empty.
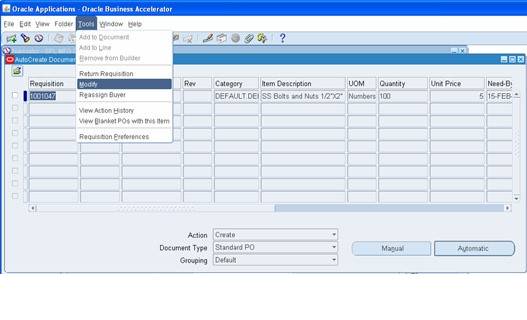
2. Go to Tools to Modify (Increase or Decrease) the Quantity for an Item in the Purchase Requisition before Creating the Purchase Order if required.
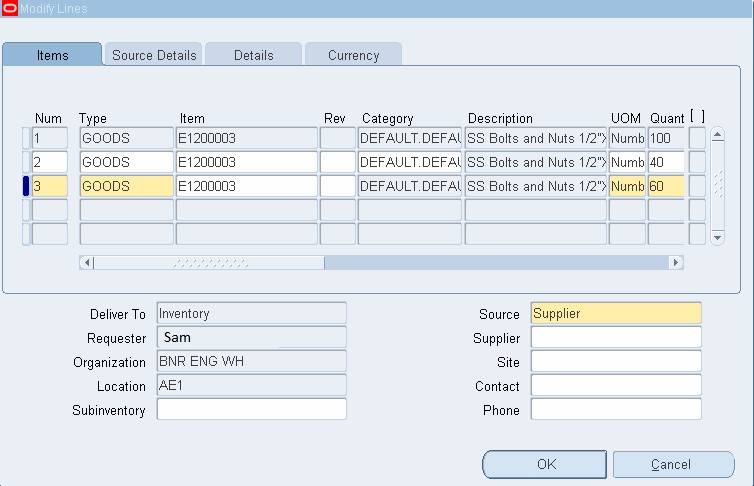
For the above said requisition, the quantity has been modified to 60 and 40 values respectively.
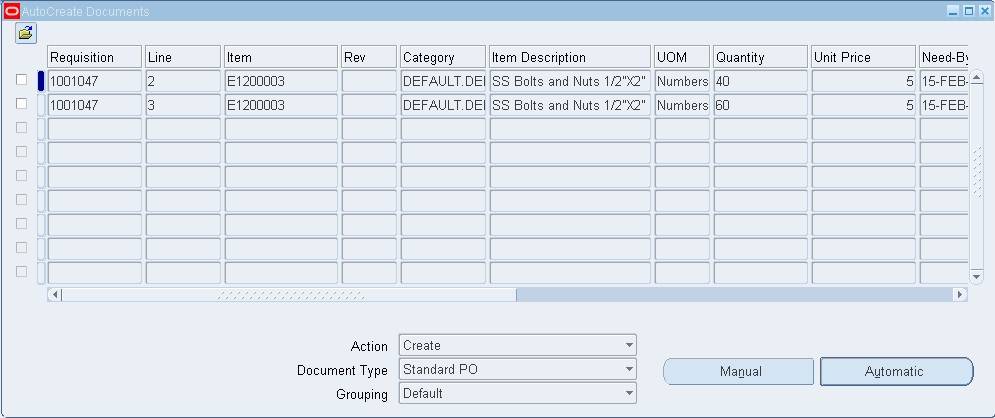
If you query the requisition it will show two lines with modified quantities. You can create Purchase Orders against these two lines. Once both the lines are converted into PO, no lines will be visible for that requisition.
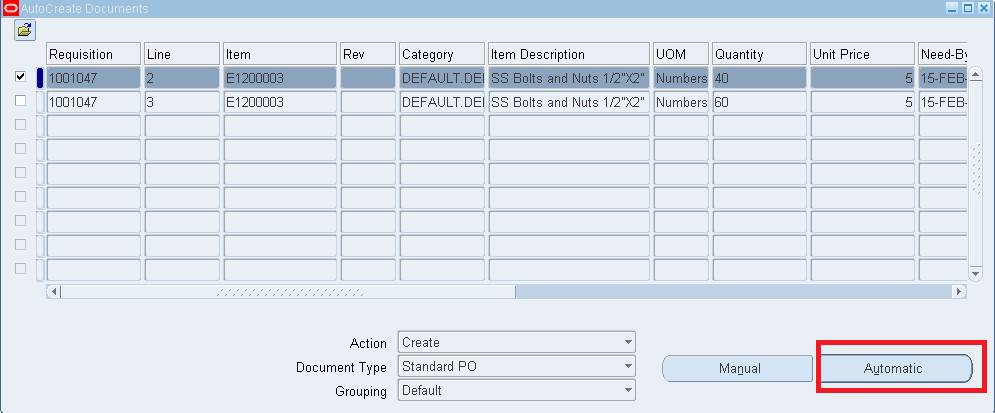
3. Click on the ‘Autocreate’ Button to Create the Purchase Requisition into a Purchase Order. After the window opens, select the Requisition Lines and click on ‘Automatic’.
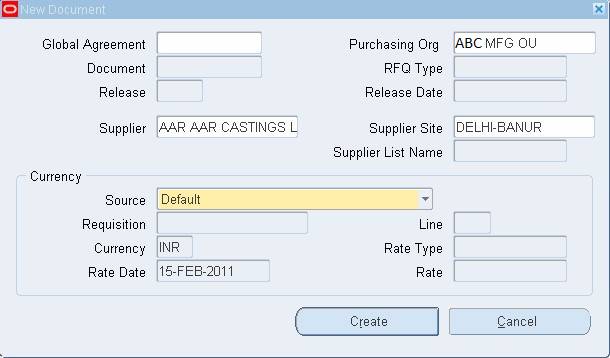
- Click “Create” after entering the Supplier Name and Supplier Site. You can also include the Supplier’s name and Site information in the Purchase Order.
5. Purchase order will be created automatically. Enter the Ship to Location.
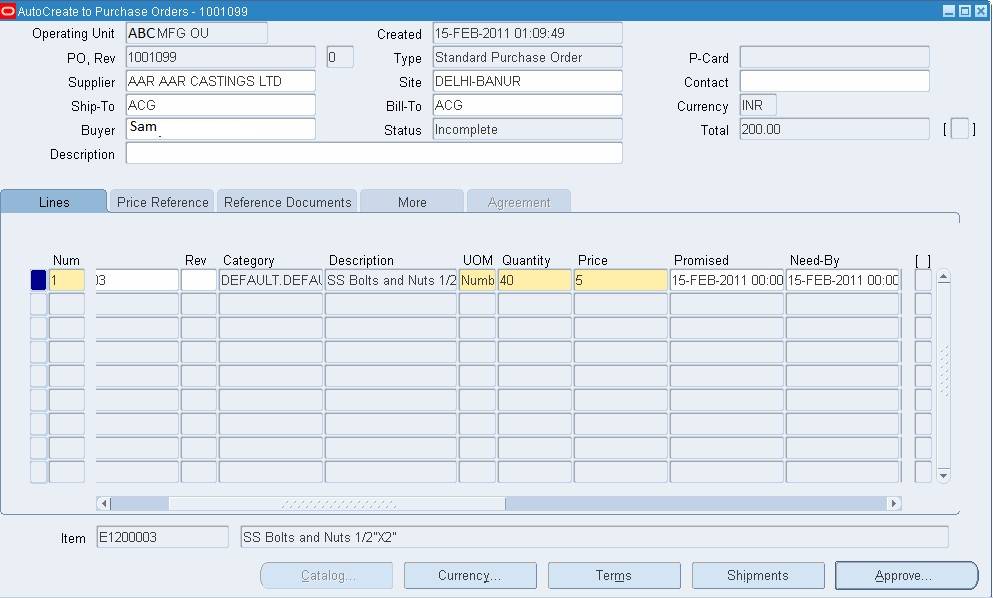
The requisition lines are all preset to the PO line. Now input the item’s agreed-upon price with the Supplier, as well as any applicable taxes. Go to the following Navigation to do the same.
India Local Purchasing → India Localization → Purchase Orders → Purchase Orders(Localized)
6. Query for the Purchase Order.
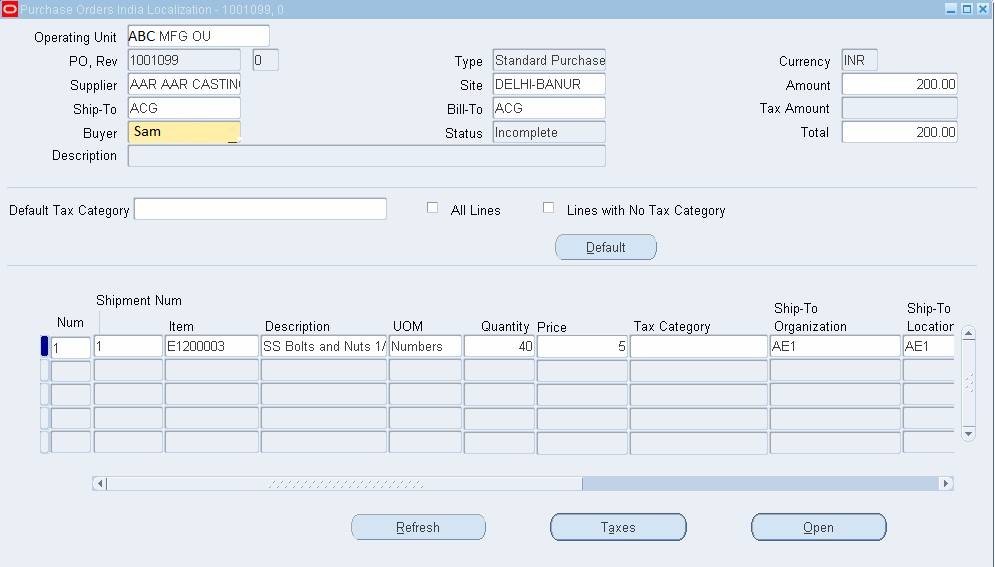
7. Next, select the Taxes option and enter the appropriate taxes.
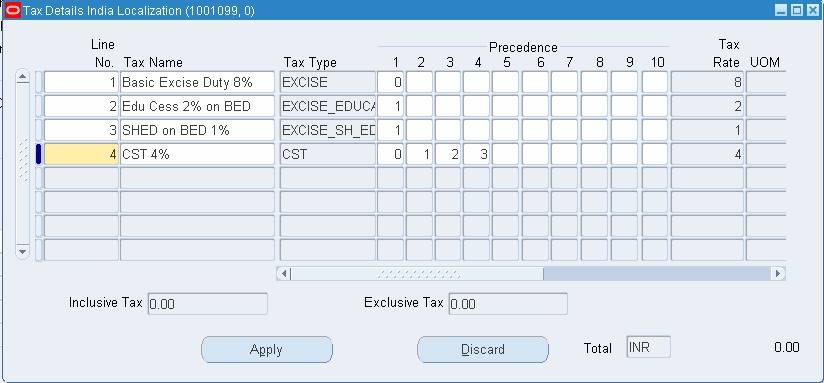
Click on Apply and Save it.
8. The total PO value along with taxes will be displayed at the PO header.
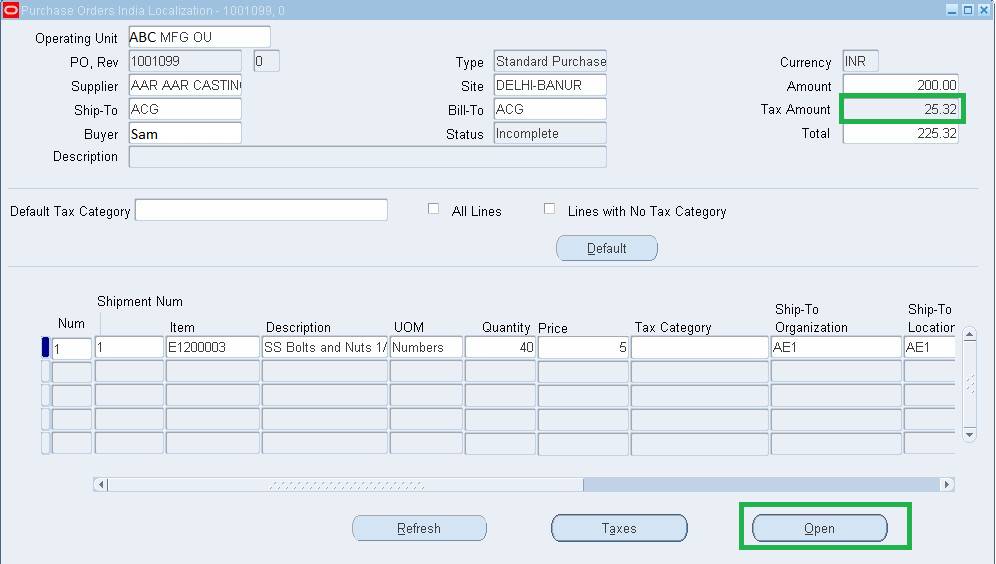
9. Click on ‘Open’ button to enter into the standard purchase order form to submit for approval.
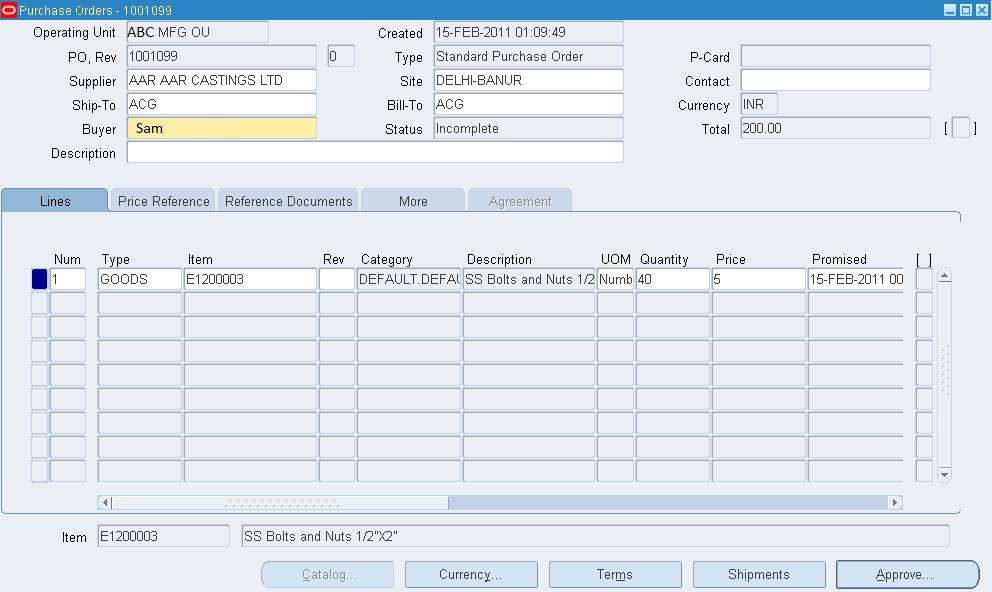
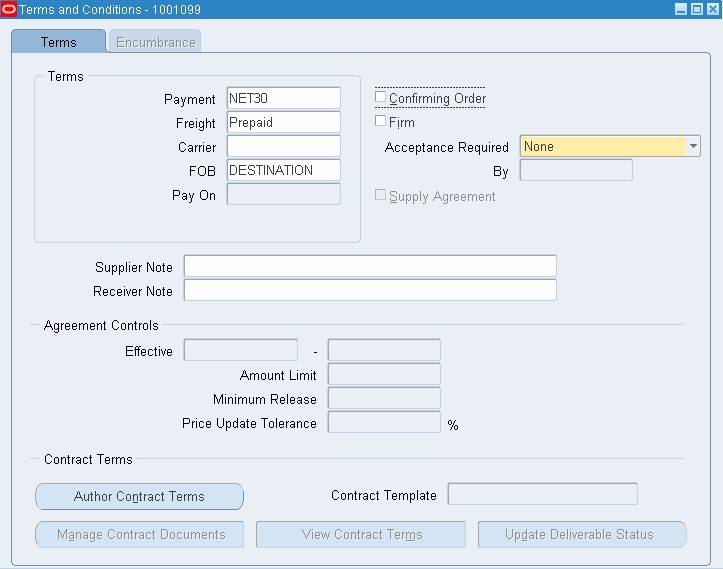
- Add the Terms and Conditions to the Purchase Order’s Terms tab as shown below.
- Check the Purchase Order for any necessary revisions. Otherwise, use the ‘Approve’ option to submit the PO for approval.
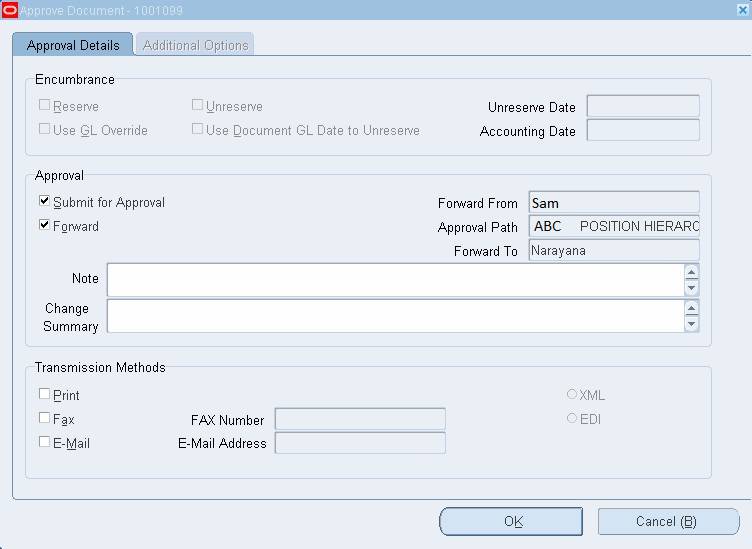
- Select the OK button. The PO will be approved according to the approval hierarchy that has been established.
During that time, the Purchase Order’s status will be In Process. - The approver will be notified that the Purchase Order needs to be approved.

14. Select the check box and click onto Open tab.
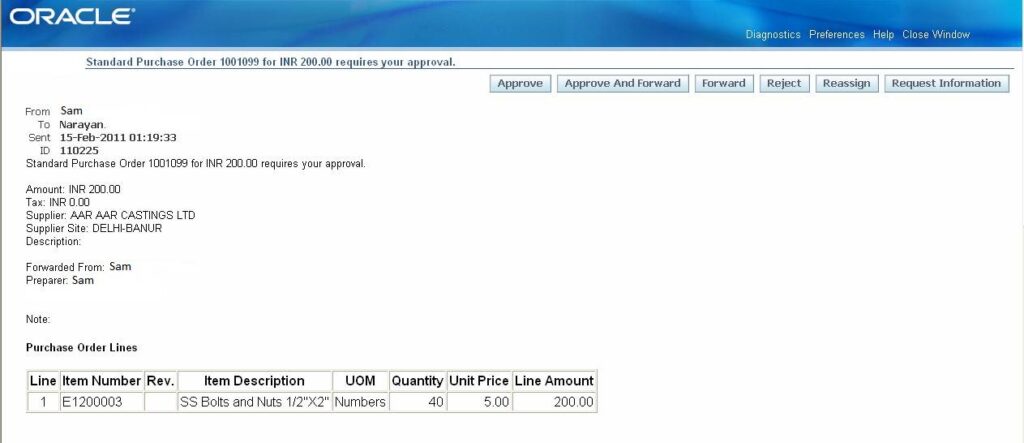
15. The approver has the option to either Approve, approve and forward, reject, forward, reassign or request information for the PO. In this case click onto approve.
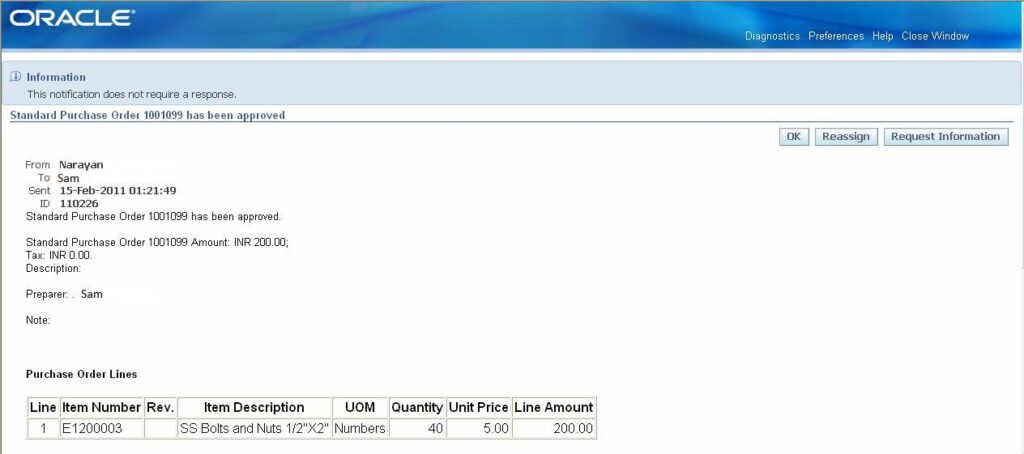
16. Once the PO is accepted, the buyer who submitted it will receive a message confirming the approval of his PO.

17. Select the PO and click onto the Open tab to see the approved PO.
PURCHASE ORDERS – MANUAL CREATION
You can do the same things with manual buy orders as you can with regular purchase orders, such as authorizing and finishing them. It may be necessary to manually enter Purchase orders in some cases. Manually entering Purchase Orders steps as follows.
Navigation
India Local Purchasing→ India Localization → Purchase Order (Localized)
- Open the Purchase Orders window. The following window is displayed by the system.
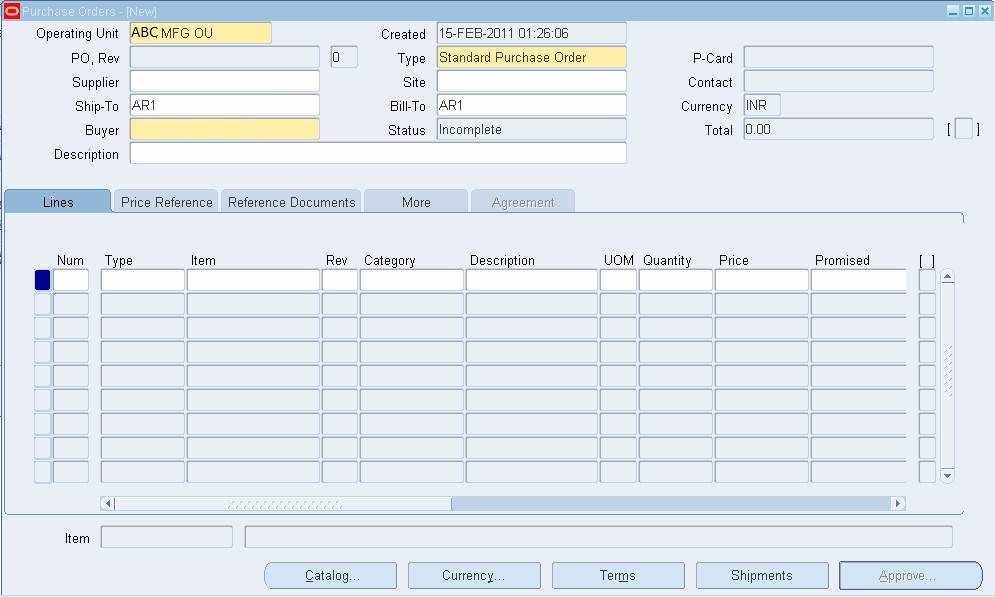
- Enter the supplier’s name and site where the order should be placed.
- Check the Purchase Order’s “Ship-to” and “Bill-to” addresses.
- Select “Goods” as the type.
- Choose the item for which a purchase order should be issued.
The system defaults category, description, and UOM based on the item selected. - Enter the quantity you need to order as well as the agreed-upon per-unit price for the desired item.
- Verify that the Purchase order’s basic value is correct (i.e. Order amount without taxes).
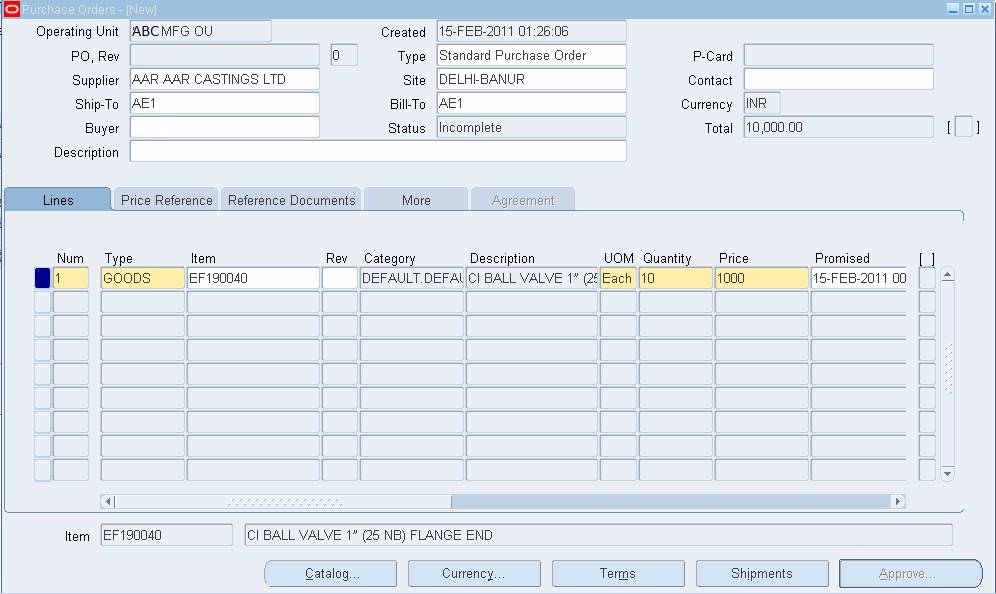
8. Click on the ‘Shipments’ tab. Entering Shipment Details as below:
a) Enter the shipment lines for the PO.
b) In Shipment line the Organization is the Inventory Organization that will do the receiving transaction against this Purchase Order.
c) For one Purchase Order line if required multiple shipment line can be defined.
d) The total quantity for the all the shipment line should be equal to the Purchase Order line.
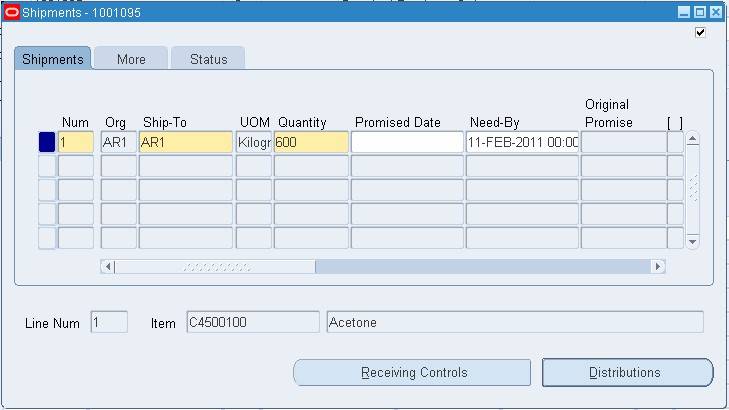
e) Save it. Once you’ve saved your document, the system will generate a unique document number for you.
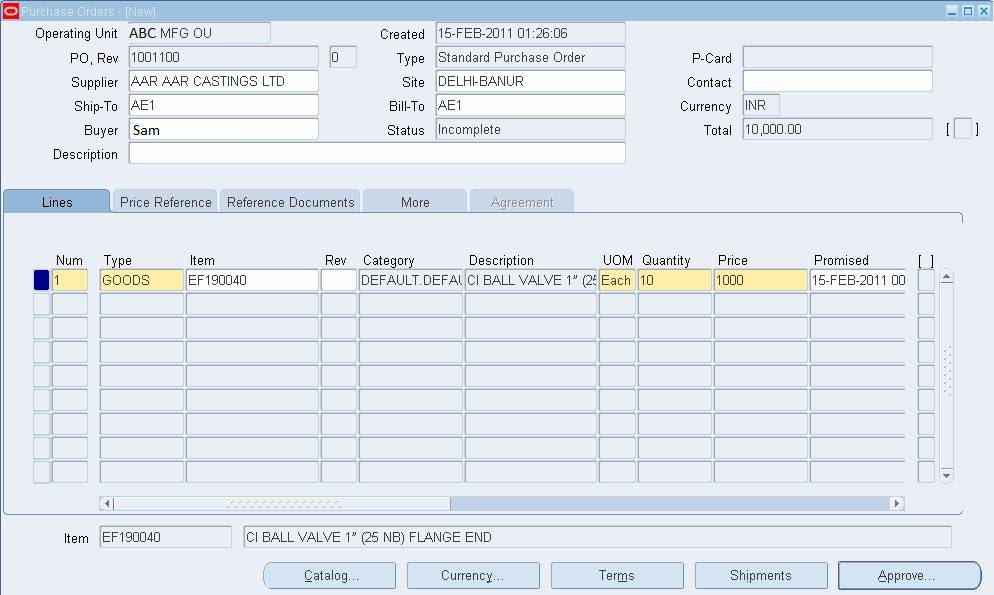
f) If applicable, update taxes in the purchase order (localized) screen and submit for approval (similar to Autocreate purchase order functionality).
BLANKET PURCHASE AGREEMENT
When you know the details of the items or services you expect to buy from a specific supplier over a period of time but not the details of your delivery dates, you can form blanket purchase agreements.
Before actually acquiring your Items, you can use blanket purchase agreements to define negotiated rates.
Blanket purchase agreements can be made for a single organization or shared among multiple business units within your company (global agreements).
Navigation
India Local Purchasing → Purchase Orders → Purchase Orders
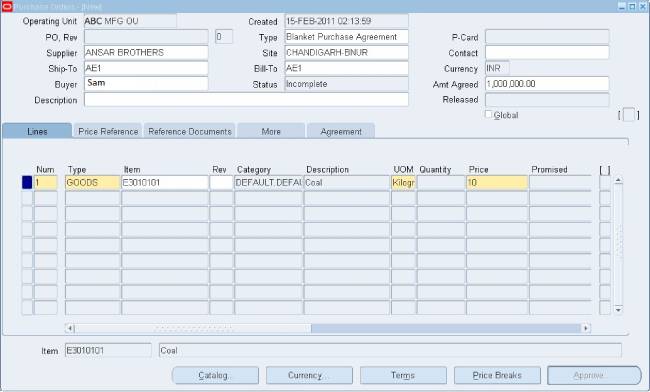
1. Select the Type as ‘Blanket Purchase Agreement’.
2. Enter the Supplier details.
3. Enter the amount that has been agreed upon in the ‘Amt Agreed’ field.
4. Enter the item. Only the Price that has been agreed upon needs to be entered. The quantity field is greyed out as in Blanket Purchase Agreement, quantity is undefined.
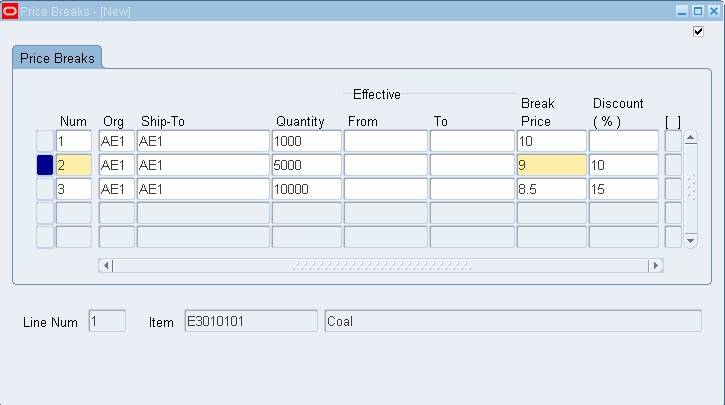
- Enter price break information for blanket purchase agreement lines in the Price Break window.
Price breaks are used to apply any reductions offered by the supplier to the quantity ordered.
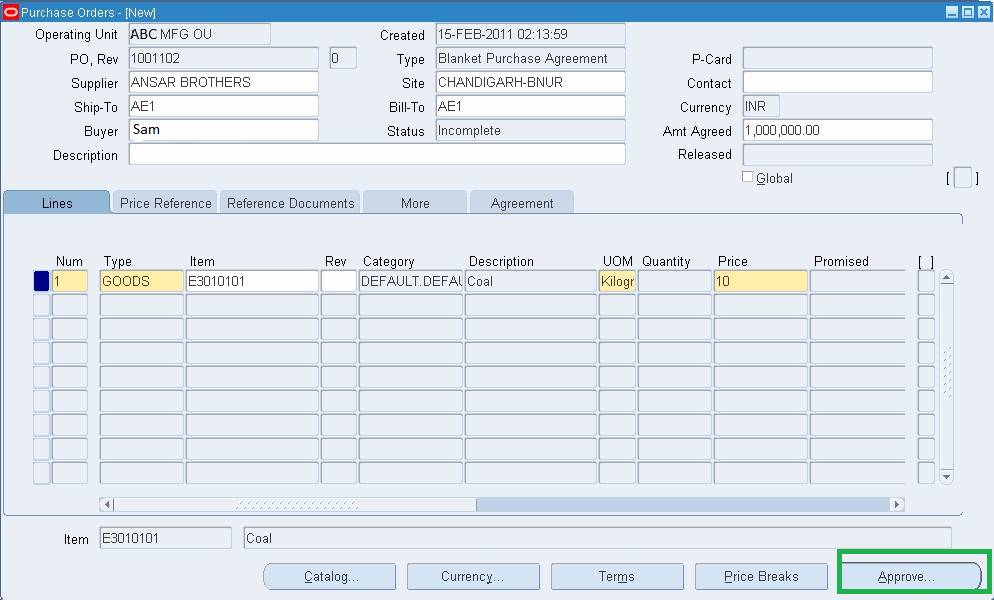
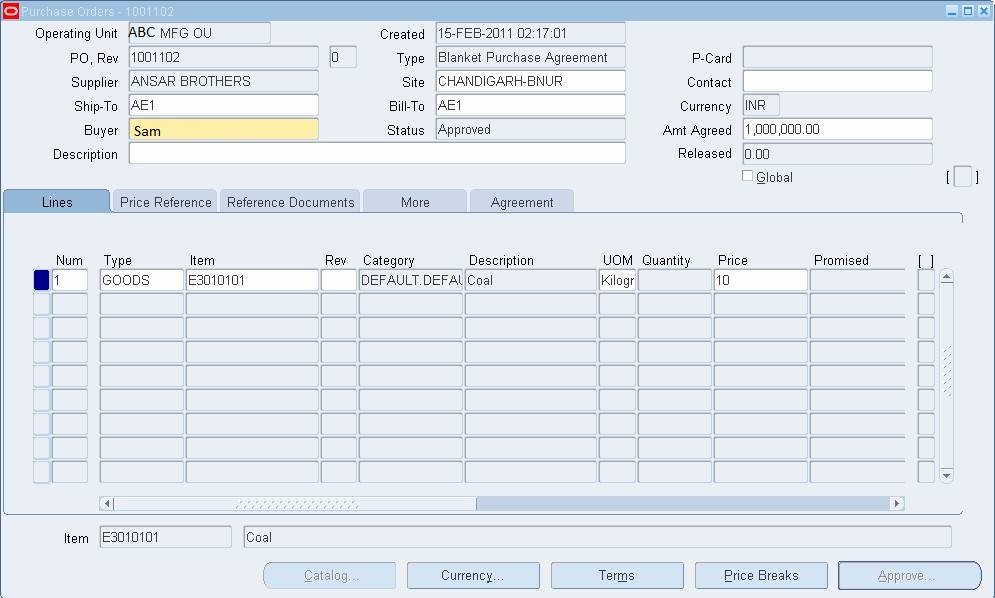
- Save the Blanket Purchase Agreement and send it for approval.The approval process for Blanket Purchase Agreement is same as discussed for Purchase Orders and it follows the same approval hierarchy.
RELEASES AGAINST BLANKET PURCHASE AGREEMENT
The blanket release is an order for products or services that you place in response to a blanket purchase agreement.
Releases are used to enter,edit and approve releases against blanket purchase agreements.
The qualities and prices of items are determined by the blanket agreement.
The compensation for the Job Order will be spelled forth in a lump sum amount in the Blanket Release.The release can be created manually or automatically.
Navigation
India Local Purchasing → India Localization → Releases (Localized)
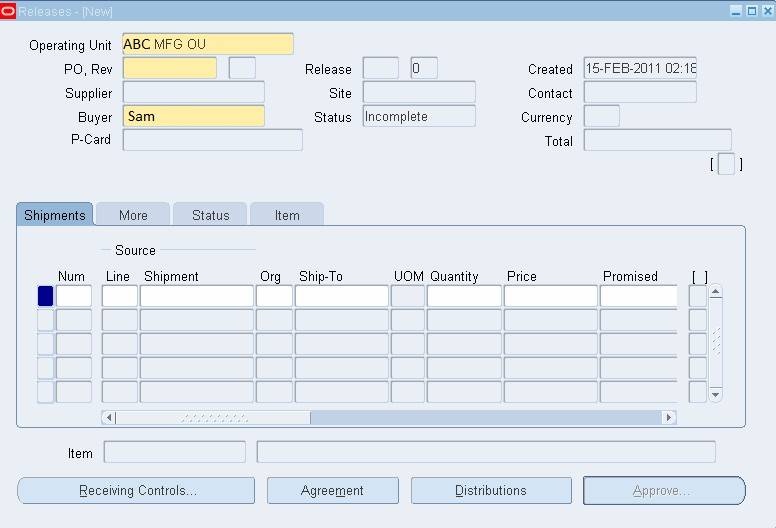
- Fill in the PO number for the release you’d like to create.
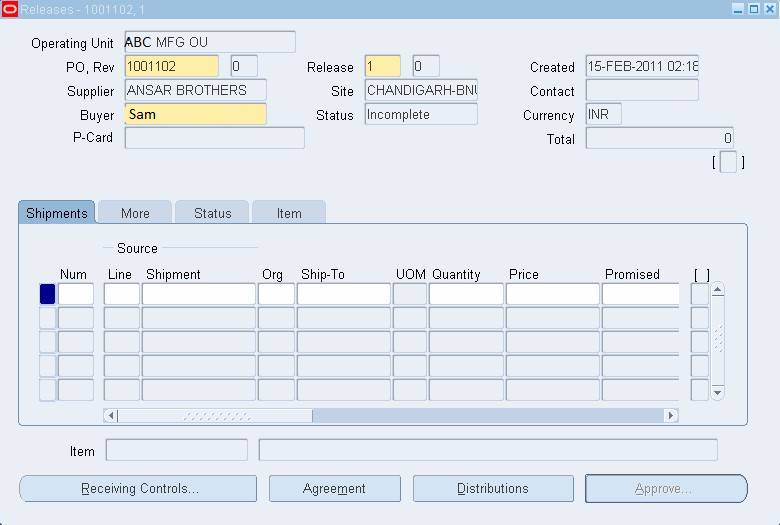
- The Supplier, Site, and Currency for a purchase order are displayed when you choose it. It also shows the current Status of the release as well as the current total amount of the release.
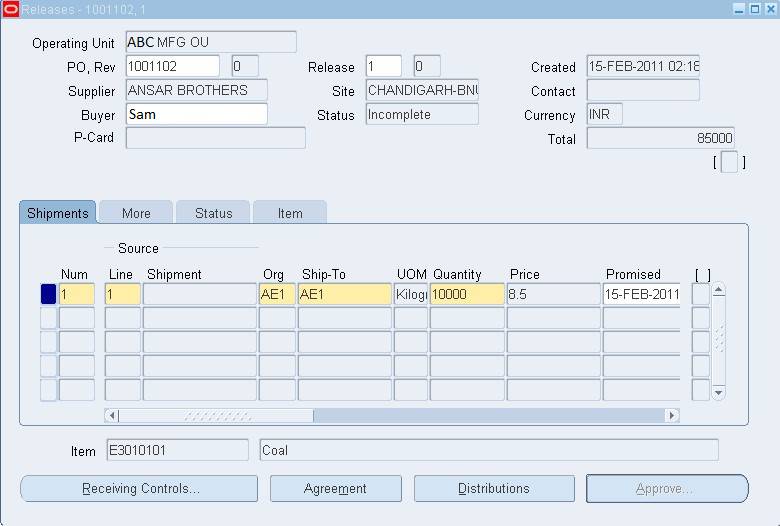
- Fill up the shipment details. The pricing field has been disabled. Only the amount field and the Need By date must be filled out.It should be saved.The field for Release is greyed out.
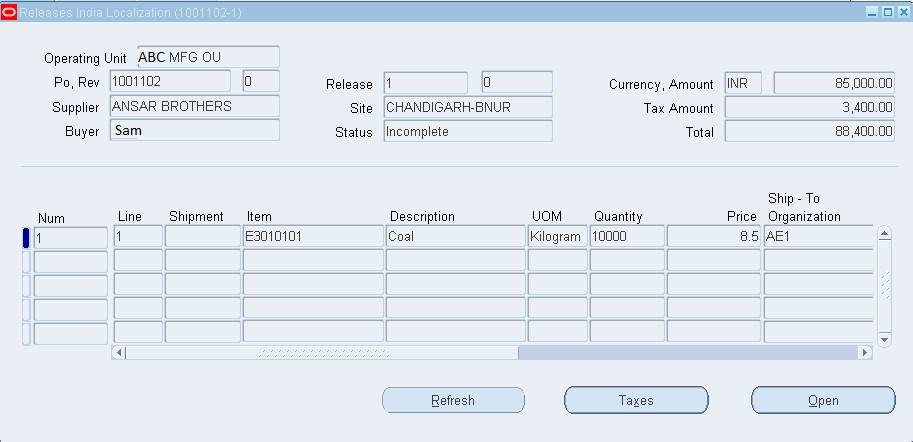
- Enter the Taxes as applicable.
- Apply and save the record.
- Now submit the release for approval. Approval process for Releases is same as that of other documents.
- Once the release is approved, the release amount will be reflected in the BPA.
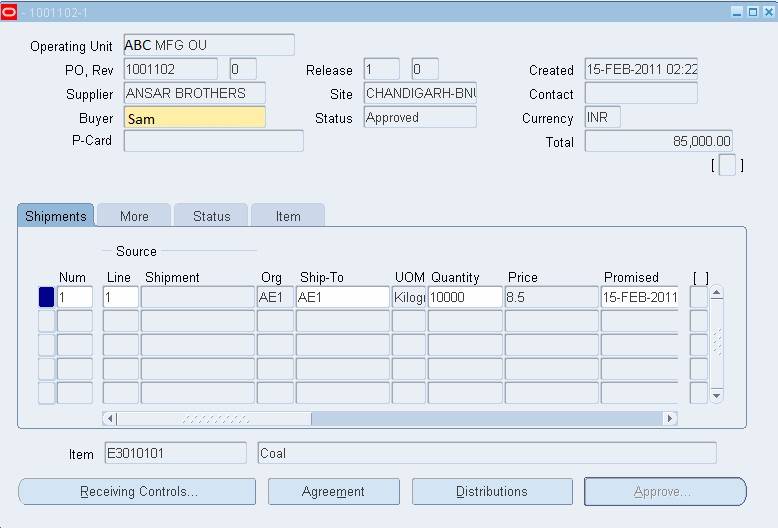
JOB WORK ORDERS
A job work order is a document that contains all of the details regarding a maintenance activity as well as a timeline for finishing it. Work orders might include information such as who authorized the project, its scope, who is responsible for it, and what is expected of them. It’s possible that a work order is for goods or services.
Navigation India Local Purchasing → India Localization → Purchase Orders (Localized)
- Go to the India Localized PO window and click on it.
- Choose ‘Standard Purchase Order’ as the type and fill in the Supplier Name and Site Information.
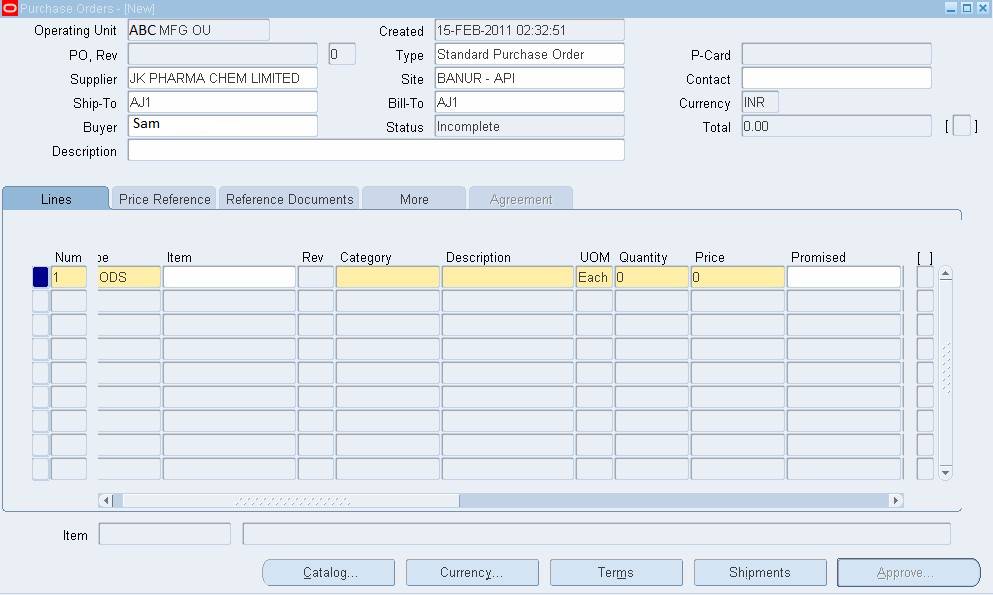
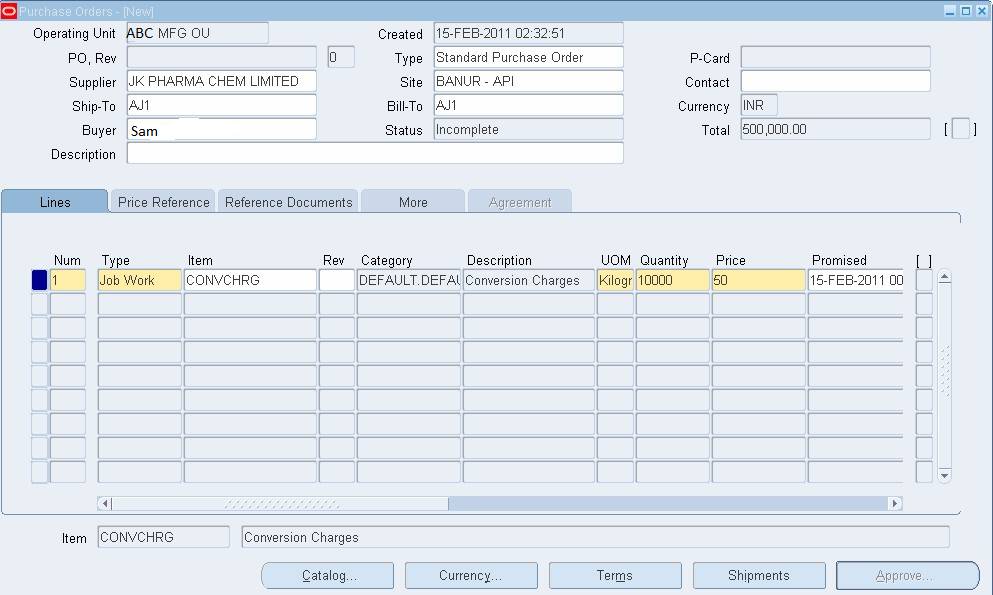
- Select ‘Job Work’ as the Line Type. The Description field allows you to specify the type of work for which the work order is being created. Fill in the work order’s quantity and amount.
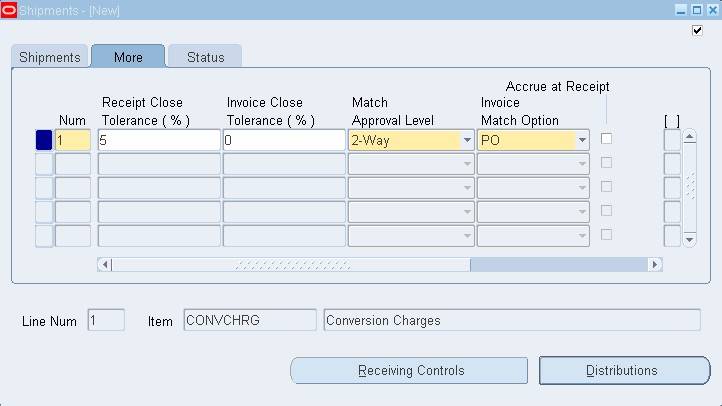
- Next, select the ‘Shipments’ tab. Make sure the ‘Match Approval Level’ is 2 -Way and the ‘Invoice Match Option’ is PO.
- Go to the Distributions Tab and look at the PO charge account. When the Line Type is ‘Job Work,’ the Destination Type will always be “Expense.”
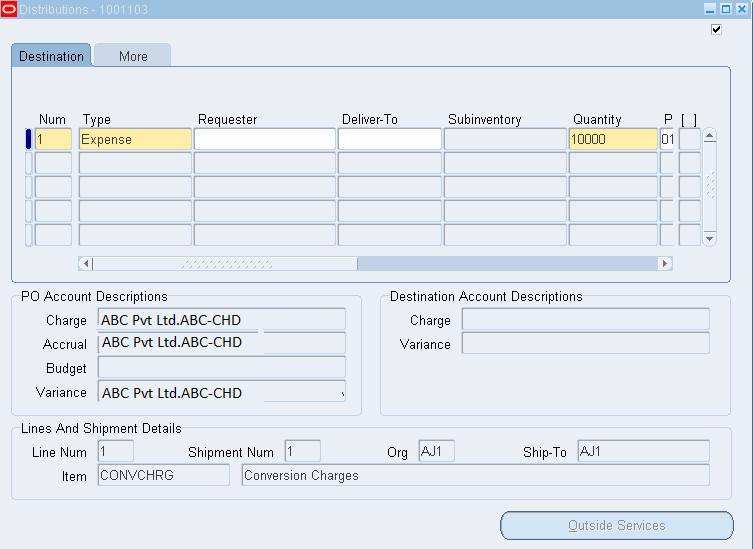
- Save the Work Order.System automatically generates an unique number.Enter the taxes as applicable and submit the work order for approval.
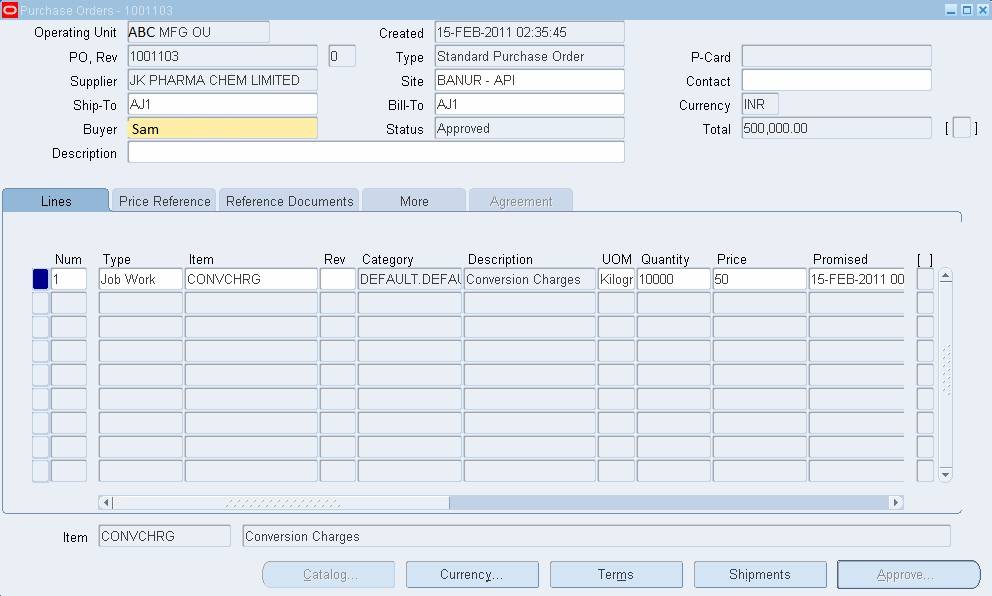
PO/WORK ORDER AMENDMENT
When you update a purchase order (PO), the Purchase Order Amendment (POA) is created and is based on the previous PO.
A Purchase Order Amendment in Oracle Apps allows you to add or alter certain data components on an approved Purchase Order. By doing so,the system creates a new version of the electronic document known as a Purchase Order Amendment (POA), which can be processed or routed independently. The POA will then be communicated to the Vendor as a new version of the purchase order.
Navigation
India Local Purchasing → Purchase Orders → Purchase Orders
- Query the Purchase Order for which revisions or changes are required.
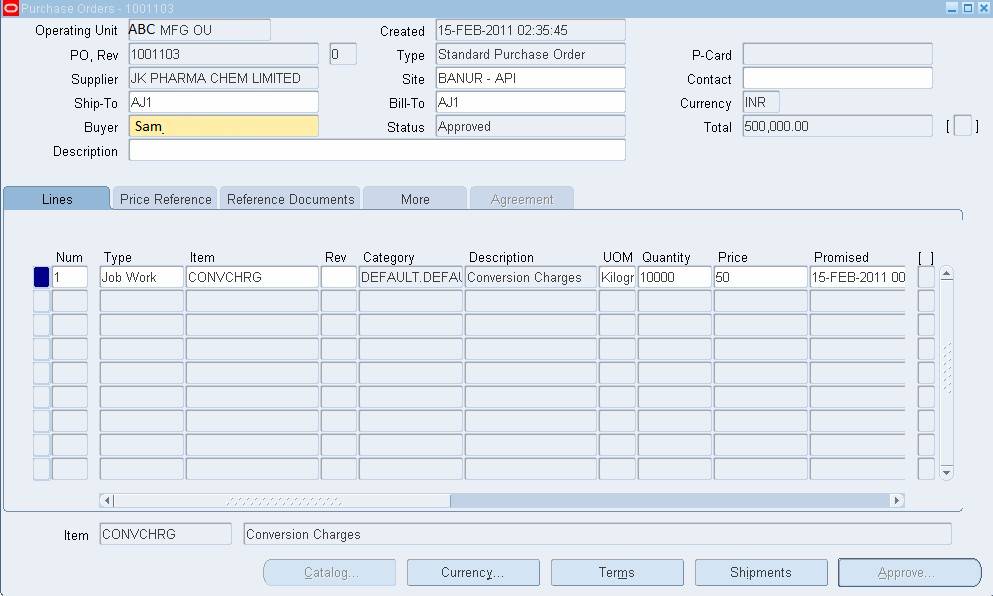
- Make a modification to the quantity field.Reduce the price to 50 cents from 60 cents and save it. A notification will appear stating that the revision number has changed. The value ‘1’ is displayed in the field next to PO, Rev number, indicating that the PO has undergone its first revision. After that, the number in this field is incremented by one for each subsequent revision.
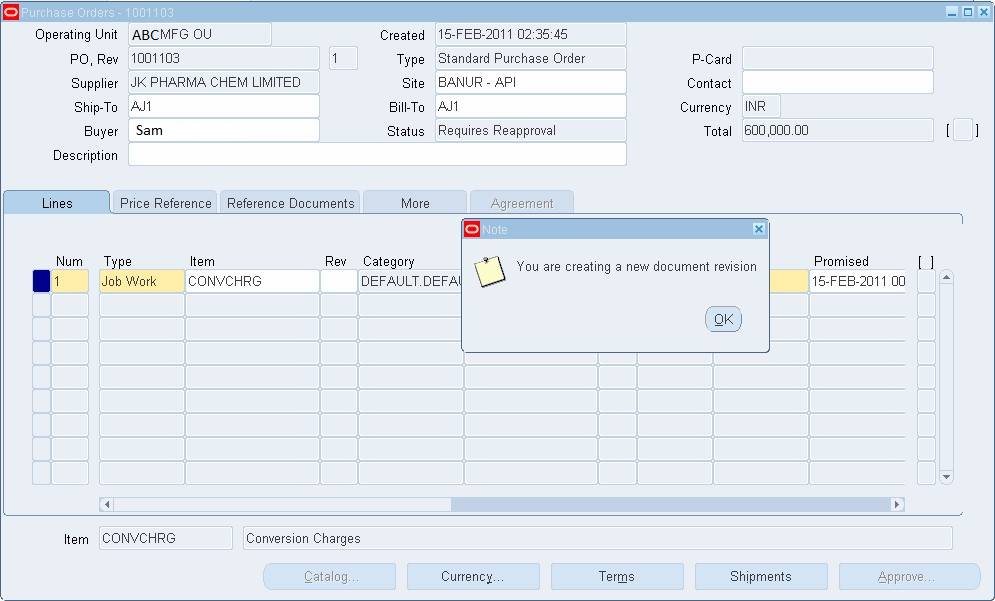
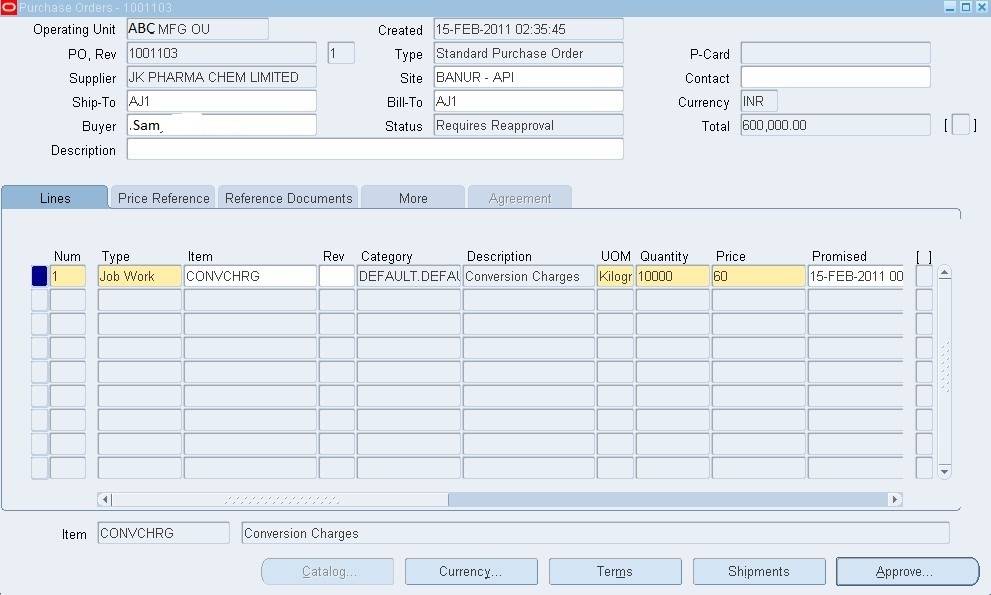
The PO’s status is changed to ‘Requires Reapproval’.As stated in the previous section, submit the PO for approval.
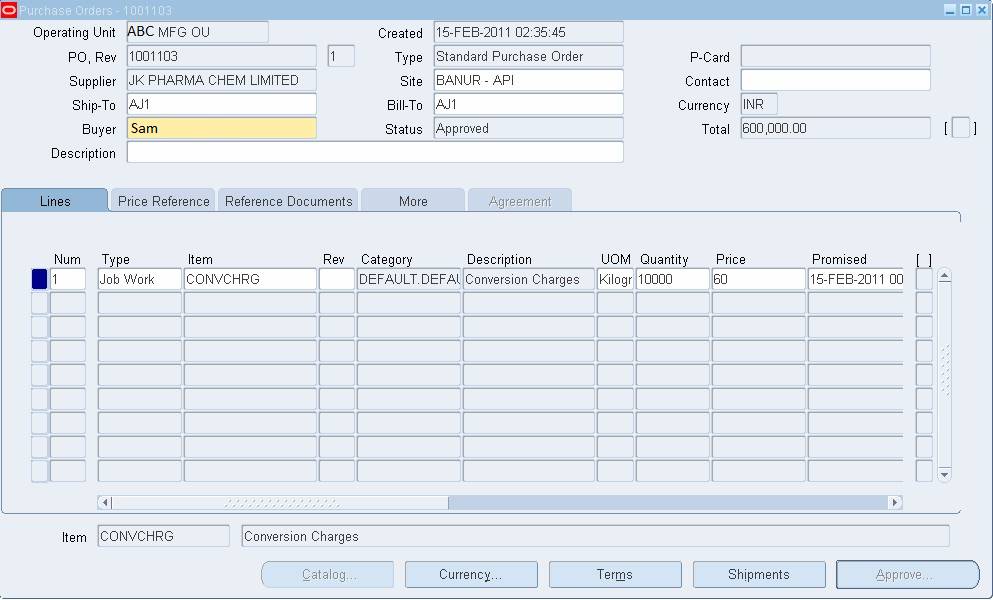
PURCHASE ORDER SUMMARY
Purchase Order Summary form can be used to view the existing purchase orders and Blanket purchase releases by using multiple options like Purchase order number,Supplier Buyer Item,Date range,Status etc.
Navigation India Local Purchasing → Purchase Orders → Purchase Order Summary
- In the Number field, query the Purchase Order by entering the PO number.
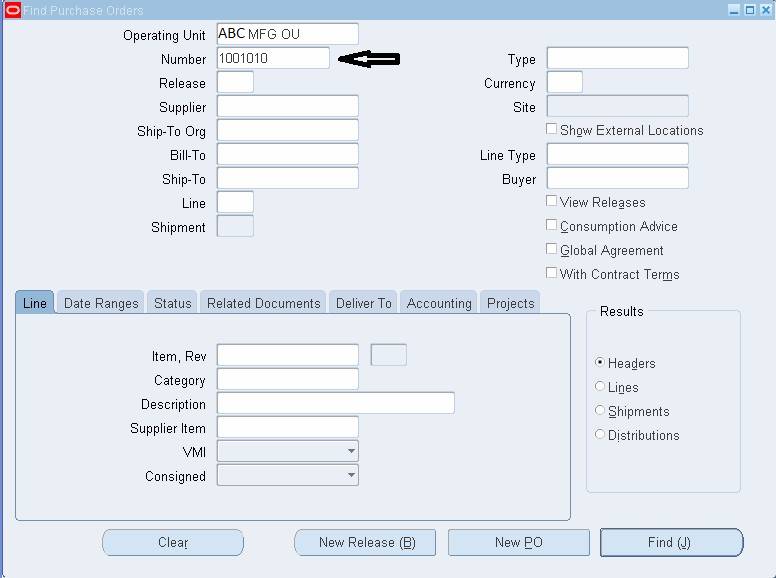
The tabbed regions can be used to narrow down your search with more specific information.
a) In the Line region, you can search for items using the following criteria: Item number, Revision number, Job (Oracle Services Procurement), Category, item, Description, Supplier Item Number, VMI (Yes or No), and Consigned (Yes or No).
b) You can input Date ranges for the following dates in the Date Ranges region: Order, Approved, Promised, Need By, and Closed.
c) In the Status section, you can narrow down your search by:
• Order Approval status (Approved, In Process, Incomplete, Pre- Approved, Rejected, or Requires Re-approval).
• Control status (Open, Closed, Finally Closed, Closed for Invoicing,Receiving, or Cancelled).
• Hold status (Yes or No).
• Frozen status (Yes or No).
• Firmed status (Yes or No).
d) In the Related Documents region, you can limit the search by Contract number, Receipt number, Invoice number,Requisition number,Paper Requisition number,Supplier Quote number and Source Document information (Type, Number, Line).
e) In the Deliver To region,you can limit the search by destination Type (Expense,Inventory,Shop Floor),Deliver To Person, Organization,Location, and Sub-inventory.
f) In the Accounting region,you can limit the search by Period, GL Date, Charge.
2. Now click onto Find. We get the relevant information as per the below screen.
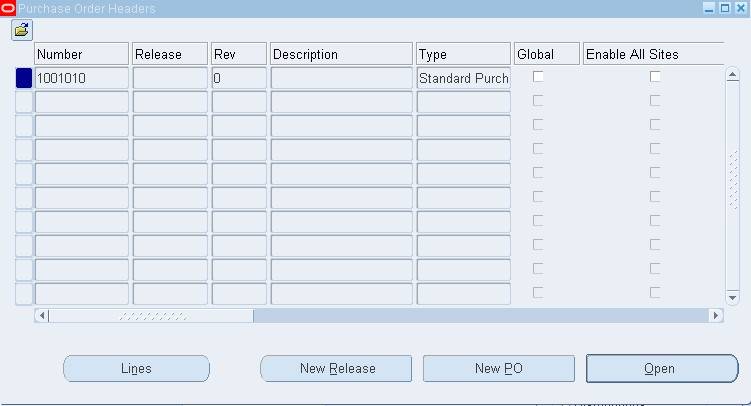
3. By selecting the ‘Lines’ tab, we may obtain information about a PO’s lines.
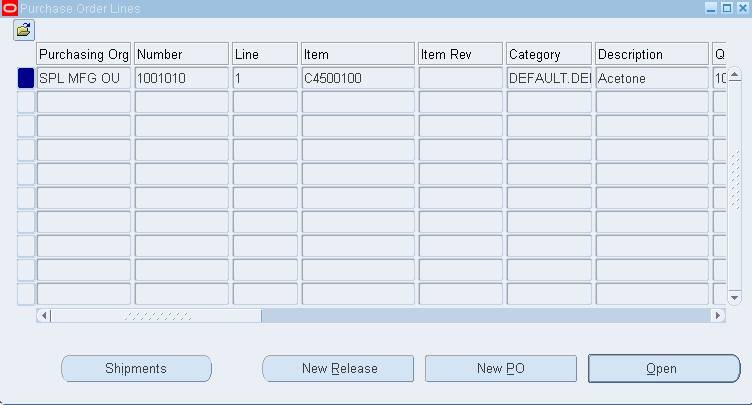
4. Go to the Shipments Tab to see line-by-line detail information about a shipment.
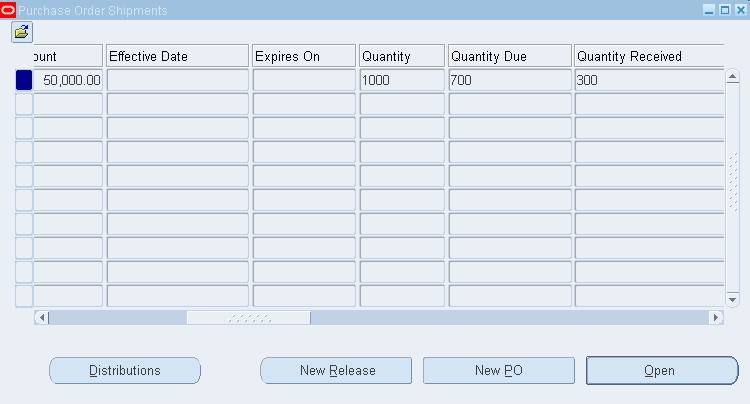
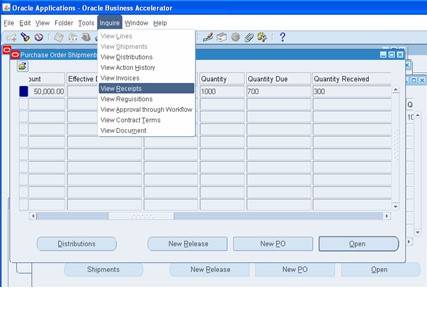
5. From the ‘Inquiries’ menu, select ‘View Receipt’ to view the receipt details for the ‘Quantity Received’.
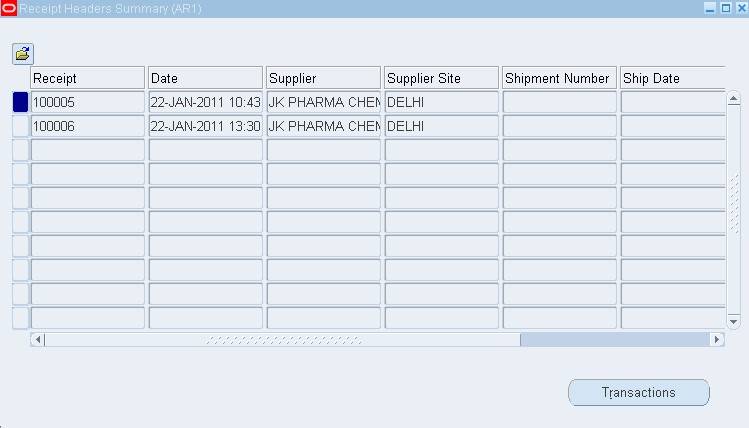
6. From the ‘Inquiries’ menu, select ‘View Invoice’ to view the payable invoice details for the received consignments.

PO CHANGE HISTORY
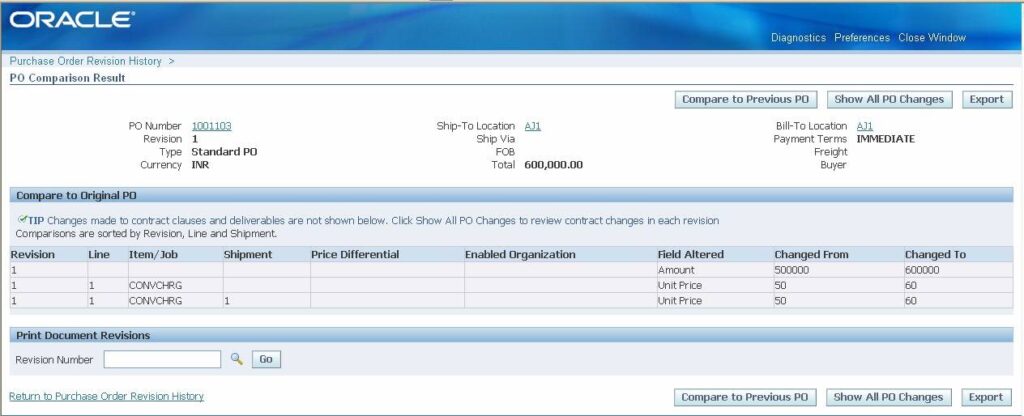
The Oracle Purchasing Navigator’s PO Change History menu feature provides even more detailed information about all previous updates to archived purchase orders at a glance.The archived versions are displayed using a Web browser in this menu option.The current purchase order can then be compared to a previous revision, or all previous changes can be viewed. You can see which fields have changed, as well as what they were before and after the update.
You may get to this window by selecting Change History from the Purchase Order Summary window’s Tools menu. If your organization has implemented the standard Oracle Purchasing menu, you can access this window by selecting Purchase Orders and then PO Change History from the Purchasing responsibility.
Navigation India Local Purchasing→ Purchase Orders → PO Change History
- From LOV, choose the Operating Unit and PO number for which you want to see changes.
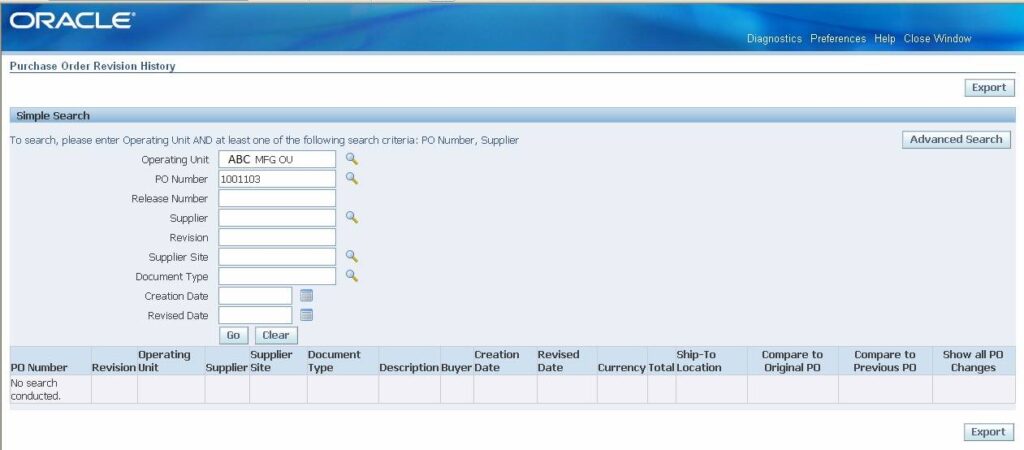
2. Click onto ‘Go’ button to view the details.
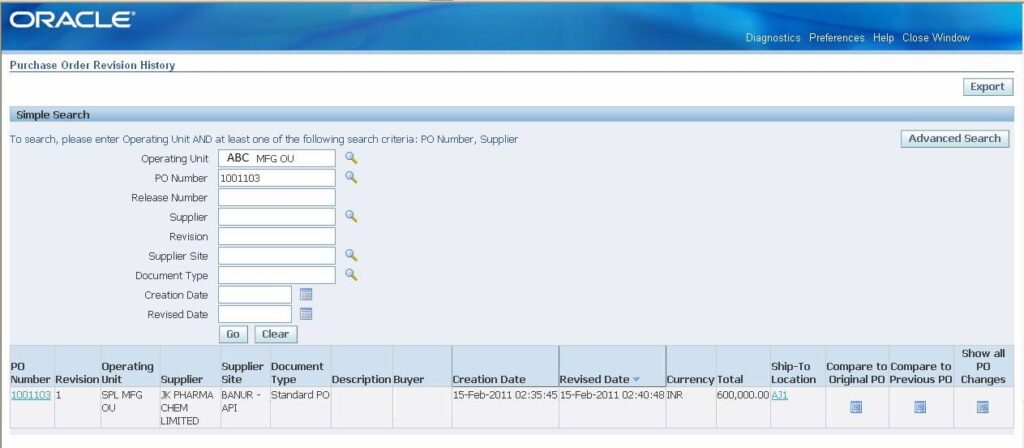
3. It has a value of ‘1’ against the ‘Revision’ field, indicating that this particular PO has undergone one revision/amendment. Changes to the PO can be evaluated in three different ways:-
• Compare to Original PO
• Compare to Previous PO
• Show all PO changes
FORWARD DOCUMENTS
To forward all or selected documents pending approval from one approver to a new approver, use the Forward Documents window.This allows you to keep your documents flowing even if the document’s original approver is unavailable.
Navigation
India Local Purchasing→ Oracle Purchasing → Management →Forward Documents
- From the menu, choose Forward Documents.The Find Documents window appears when you purchase something.
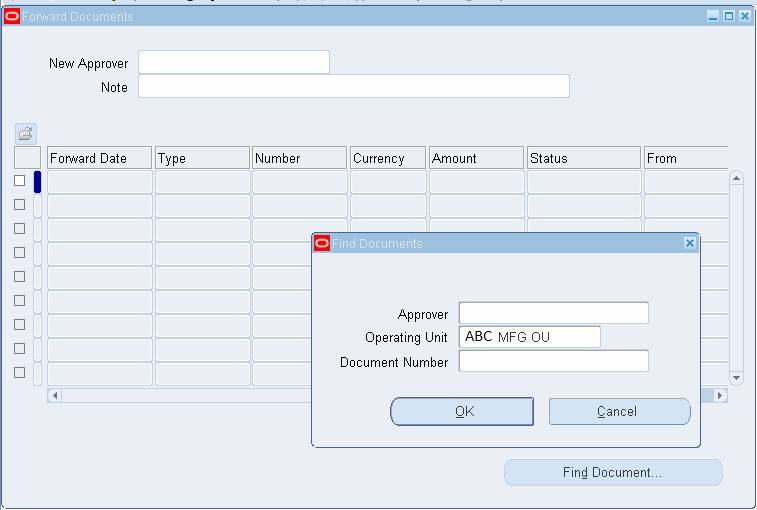
2. Choose an approver and/or a document number.
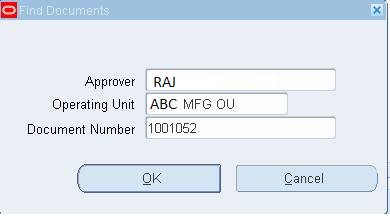
3. Press the OK button.The screen below appears.
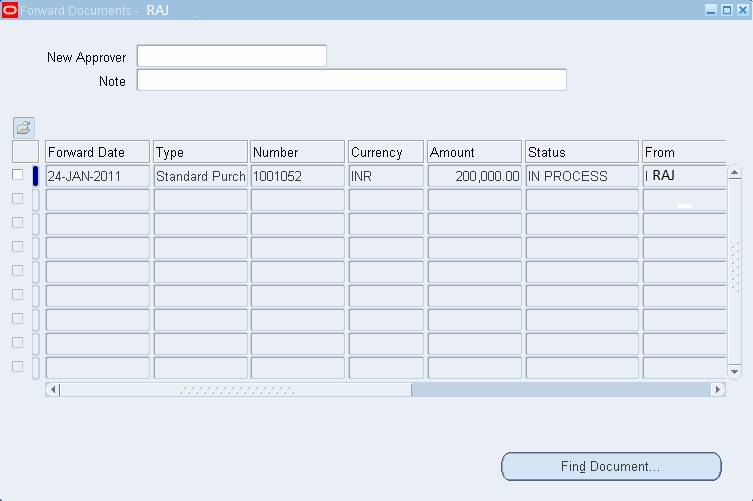
Purchasing displays the Forward Date, document Type, document Number, Currency, Amount, Status, From person, Note, document Description, document Owner, and Creation Date for each document available for forwarding.
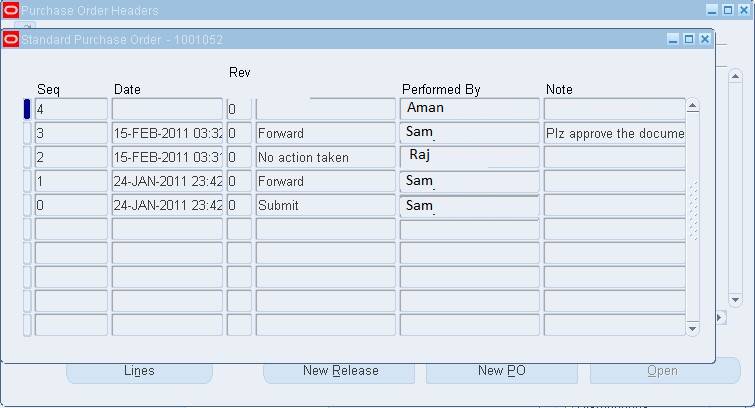
4. Select the document and input the New Approver to whom you want the documents to be forwarded.It should be saved.
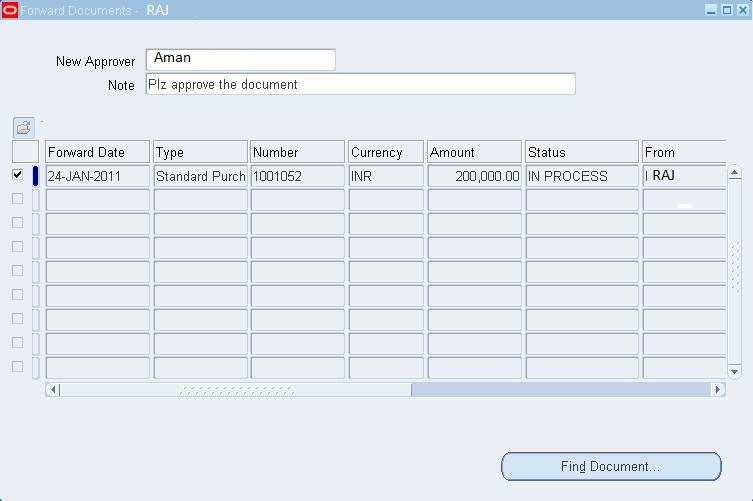
5. At the new approver’s end, a notification will be received informing that the forwarded document must be approved.
