Concept
Accounting entries for invoice and payment transactions in Payables are handled through Oracle Sub-ledger accounting. Sub-ledger accounting is a rule-based accounting engine and repository that centralizes accounting across the e-business suite. It acts as an intermediate step between the sub-ledger application and General Ledger. Sub-ledger accounting creates the final accounting for sub-ledger journal entries and transfers the accounting to oracle’s general ledger. Each transaction has an accounting impact is called an accounting event.
You can create accounting entries by submitting a batch program or you can create accounting entries from the transaction window for a specific invoice, or payment. After Payables creates accounting entries, you can view the accounting entries from the report menu in the Invoices and Payments window.
You can create accounting in draft, final and final post mode from the Invoice and payment window.
- Draft: When you create accounting entries in draft mode, the transaction status is not updated as accounted or processed. You are allowed to view the entries that are generated through the view accounting window.
- Final: When you run create accounting in final mode, payable accounts the transactions but does not transfer, import, and post in GL. You have to manually run Transfer to General Ledger Program to transfer entries that are accounted in final mode.
- Final Post: When you run create accounting in final post mode, payable creates accounting entries, transfers them to GL, Imports journal, and posts them in GL.
After you create accounting entries in final mode, you can submit the Payables Transfer to General Ledger Program to transfer them to an interface. From the interface, you can import journal entries to your general ledger for posting. If you post entries in Oracle General Ledger, you can drill down from a journal entry line to the accounting entry or transaction in Payables.
Procedure for creating Accounting Entries
Create Accounting Process
1. Submit the Create Accounting Process from the Submit Request window to create accounting entries in Payables.
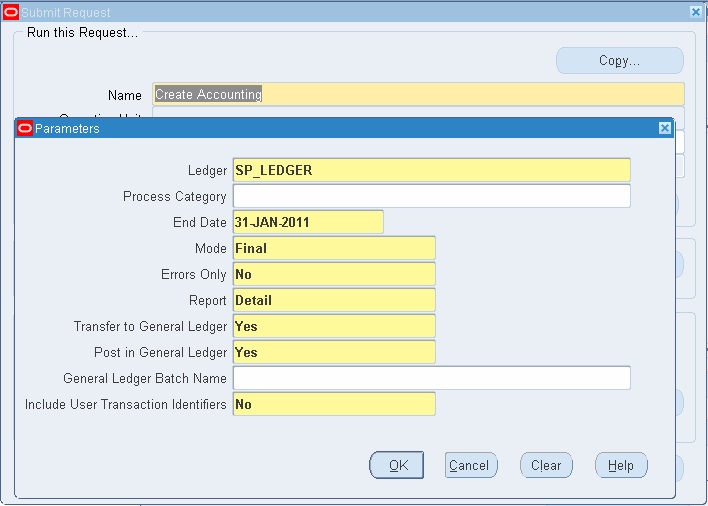
2. Select the ledger for which you are running the process. Based on the sub-ledger accounting application from which this process is submitted, the sub-ledger accounting method derives relevant application accounting definitions to identify accounting events and generate accounting entries
3. Specify the end date up to which you want the process to consider the transactions for accounting. It considers all validated transactions in payables and accounts for them.
4. You can run this report in Final and Draft Mode
5. Choose to select detail for the report parameter to view the report after the process is successfully completed.
6. When you run the process in final mode, you can choose ‘Yes’ to transfer entries to General Ledger. In case you choose the transfer to General Ledger option as ‘No’ when the process is run in final mode, you can subsequently transfer them only by using transfer journal entries to the General Ledger process.
7. You can choose ‘Yes’ to post in General Ledger if the journal is to be posted after it is imported in General Ledger. If you choose ‘No’ you have to manually query the journal in General Ledger and post them.
8. Select ok and submit the request to generate accounting entries.
9. After the process is complete, you can view the new accounting entries in the View Accounting Lines window.
India – Journal Voucher Report
Use this report to review and analyze accounting entries for all sub-ledger applications. The report displays for a given date range and journal source, GL date, JV date, Period, narration (category), Source, Account code, Description, and Debit and Credit Amounts. It groups data by GL date, source, and Category.
Create accounting entries for a single transaction or batch.
o create accounting entries for an invoice or payment:
1. Query and select the invoice, payment, or payment batch in the Invoices, Payments window. Choose the Actions button.
2. The actions window for the transaction opens. Choose the Create Accounting check box, and choose OK.
