Payments to suppliers can be entered in the Payments Workbench either individually or through the payment manager.
Payments can be made through
- Manual Payment – It is used for the recording of payments made outside payables by way of issuing of cheque or through wire transfer.
- Quick Payment – It is used for creating and printing a computer-generated payment document to pay a supplier for one or more invoices
- Payment Manager – In the payment manager we can payment process where suppliers and invoices would be automatically selected for payment based on the parameters provided like Pay group, Payment priority, Pay through date, etc. Payment document selected filters the transactions as per the payment method assigned to the payment format attached to the payment document.
An approved invoice can be paid in Accounts Payables either as a single payment or in batches. When you want to create a single payment, you either record a manual payment you generated outside of Payables, or you can create a Quick payment (single computer-generated payment). You can record zero–amount payments if the bank account you select allows them.
Procedure
Payment can be made by generating a single computer-generated check or manually preparing a check and recording the payment information in Oracle Payables
When you create a payment outside of Payables, for example, using a typed check or wire transfer, within Payables you can record the payment and update the invoices that you paid.
To record a Quick payment:
Navigation: Payments->Entry-> Payments
1. In the Payments window select Quick Type. Select the supplier and supplier site to whom payment is to be made.

2. Enter the Payment date
3. Select Bank Account from which payment is to be made.
4. Select Payment Method and Document name. The next document number defaults to the Cheque number
5. Enter the currency in which payment is to be made. By default the currency defaults from a bank account
6. Optionally enter the payment Amount. Payable defaults payment amount after we select invoices for payment and save.
7. If the payment is against the miscellaneous supplier, tax authority, excise authority or customs authority enter the actual supplier name to which payment is to be released in Paid to name field. This information will be used for cheque printing and remittance advice.
8. For Miscellaneous suppliers update the address of the supplier to whom actual payment is released.
9. If the payment currency is different from your functional currency, enter the exchange rate information.
10. Choose Enter/Adjust Invoices to navigate to the Select Invoices window.
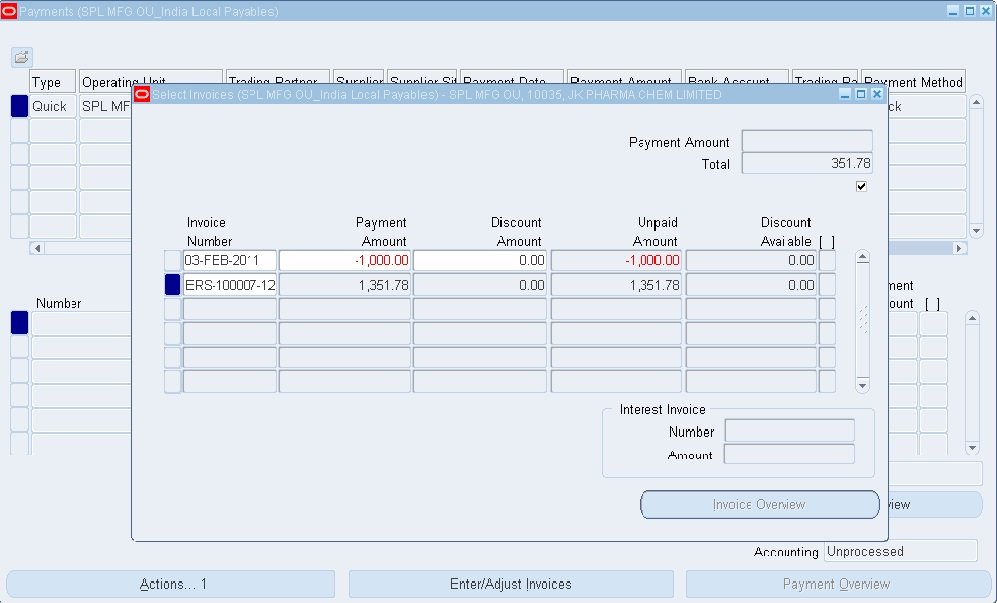
11. Select the invoices to be paid. The sum of the invoices must equal the payment Amount if you have entered it.
12. Save your work. Payable records your payment and updates the invoices as paid

The payment accounting status is currently ‘unprocessed’ Choose Create Accounting with the option to the final post
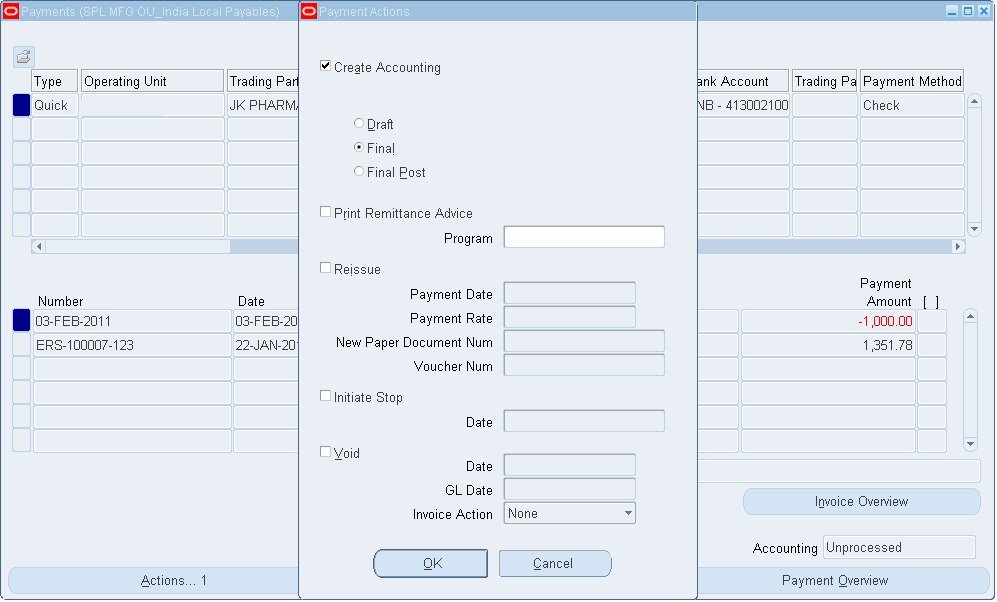
The system accounts for the payment and transfers payment entry to General Ledger